Last Updated on October 30, 2025 by teamobn
Transform your living room into a meaningful, cozy space with photo displays that celebrate your favorite people, places, and moments. This guide gives you 20 ideas with materials, step-by-step instructions, cost/time estimates, renter-friendly notes, and styling tips — plus FAQs and a comparison table to help you choose the best approach for your home.
These ever-changing odes to nostalgia come in various forms, from traditional wall galleries and picture rails to quirky fridge photos and plant hangers. They allow you creative freedom, weave uniqueness into your décor style, and keep those precious moments close to heart.
Contents
- 1 20 Photograph Display Ideas to Personalize Your Home
- 1.1 1. Wall Gallery Display
- 1.2 2. Photo Ladder
- 1.3 3. Framed Photo Shelves
- 1.4 4. Picture Rail Display (Museum-Inspired, Reconfigurable)
- 1.5 5. Window Pane Photo Frame (Vintage Charm)
- 1.6 6. String Light Photo Display (Cozy, Budget, Renter-Friendly)
- 1.7 7. Decorate With Old Door Photo Frames
- 1.8 8. Cork Board Collage (Flexible & Functional)
- 1.9 9. Magnetic Fridge Photos (Casual & Fun)
- 1.10 10. Coasters Featuring Photos
- 1.11 11. Pot Plant Hanging Photos (Green + Memories)
- 1.12 12. DIY Clipboard Galleries (Swap-Friendly)
- 1.13 13. Print Hangers
- 1.14 14. Binder Clip Display
- 1.15 15. Photo Easel
- 1.16 16. Frame Using Washi Tape
- 1.17 17. Repurpose a Screen or Fencing
- 1.18 18. Line Prints on a Photo Ledge (Layered & Changeable)
- 1.19 19. Photo Blocks (Tactile & Playful)
- 1.20 20. Shadow/Display Box (Depth and Storytelling)
- 2 In Conclusion…
At a glance
- Budget-friendly ideas (many under $30)
- Renter-safe, no-damage mounting options
- Step-by-step mini how‑tos with materials
- Layout, spacing, and sizing tips
- Comparison tables and FAQs for quick answers
20 Photograph Display Ideas to Personalize Your Home
Indeed, personalizing spaces with photo displays can turn any house into a vibrant, comforting home. Let’s see how you can use the following display ideas to personalize your space.
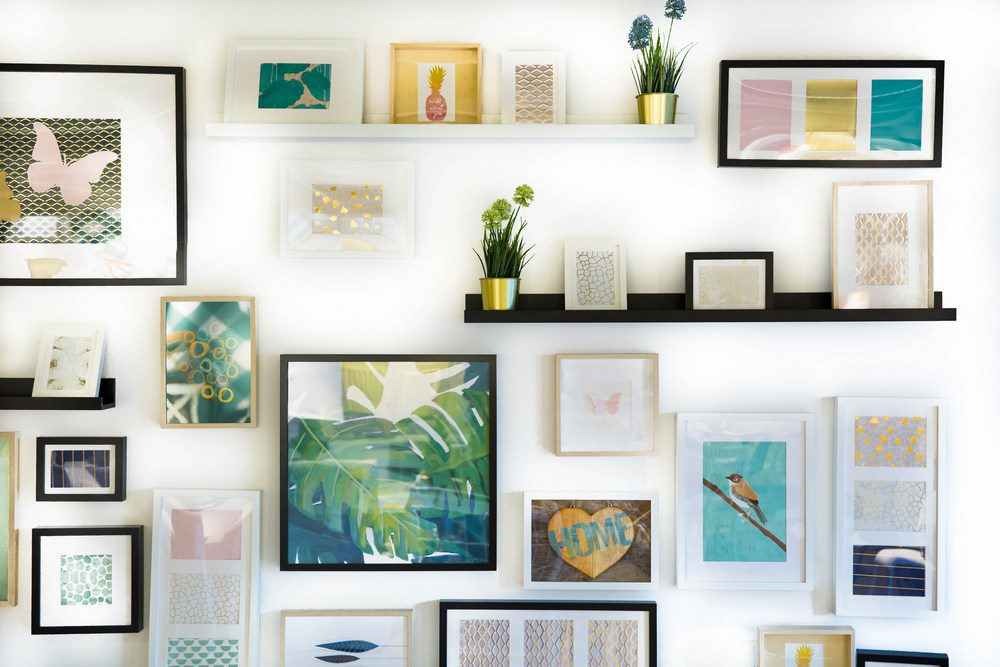
1. Wall Gallery Display
The wall gallery display radiates warmth and personality. It’s your unique canvas where memories unfold. Collect your favourite photos, not just portraits but also moments from vacations, graduations, or festivals. Interweave them intricately on any wall in your living space.
What are the materials needed to create a Wall Gallery Display?
Assorted frames (mix of sizes like 5×7, 8×10, 11×14), paper templates, painter’s tape, picture hooks or adhesive strips, level, measuring tape
How do you make a wall gallery display?
- Choose a focal wall and plan your layout on the floor. Aim for 2–3 inches spacing between frames.
- Cut paper templates for each frame and tape to the wall to preview.
- Center the overall composition at 57–60 inches from floor to frame midpoint.
- Hang frames starting from the center outward; adjust spacing for balance.
| Cost | Time | Difficulty | Renter-Friendly |
| $50–$200+ | 1.5–3 hours | Moderate | Yes , with adhesive strips (weight-limited) |
Tip: Use a consistent frame color to unify mixed photo styles. Matte prints reduce glare.
2. Photo Ladder
Photo ladders serve as a photo rack where you can drape your memories step by step. Dig out an old ladder, give it a makeover, and make your photos the centre of attention. Using a convenient background remover can make these stand out for an even more unique ensemble.
What are the materials needed to create a Photo Ladder?
Here are the materials needed to create a Photo Ladder: vintage or decorative ladder, twine or thin picture wire, mini clothespins or S-hooks, felt pads, optional wall anchor
How do you make a Photo Ladder?
- Clean and sand ladder if needed; add felt pads to feet.
- Lean the ladder securely; anchor with a discreet bracket if there’s foot traffic.
- String twine/wire across rungs; clip or hook photos at varying heights.
- Layer in small greenery or fairy lights for texture.
| Cost | Time | Difficulty | Renter-Friendly |
| $20-$120 | 45-90min | Easy | Yes (lean + minimal anchor) |
3. Framed Photo Shelves
Framed photo shelves provide an elegant solution to display your favourite pictures. These neat, linear shelves allow you to organize differently shaped frames in dynamic ways. You can create a striking impact by arranging the frames in creative patterns. It’s practical and appealing!
What are the materials needed to create Framed Photo Shelves?
Photo ledges (2–4 inch depth), screws/anchors or adhesive-rated ledges, assorted frames, level
How do you make Framed Photo Shelves?
- Mark a horizontal line at desired height; use a level.
- Install ledges per manufacturer instructions.
- Layer frames from largest to smallest, overlapping slightly.
- Style with small objects (books, bud vases) for depth.
| Cost | Time | Difficulty | Renter-Friendly |
| $30-$150 | 1-2 hours | Easy – Moderate | Sometimes (adhesive ledges exist but limit weight) |
Tip: Vertical spacing between multiple ledges: 10–12 inches.
4. Picture Rail Display (Museum-Inspired, Reconfigurable)
Arrange your life’s precious moments in style with a picture rail display. This method adds an artistic touch to your living space. Hanging framed photos along picture rails creates a sophisticated, clean gallery effect. It’s effortlessly chic and allows for easy swaps or add-ons.
What are the materials needed to create Picture Rail Display?
Check out these materials for your Picture Rail Display: picture rail molding, hooks, cords/wires, D-rings or hanging wire on frames
How do you make Picture Rail Display?
- Install rail 12–18 inches from the ceiling or per your molding height.
- Attach hooks and cords; hang frames at varied lengths.
- Adjust spacing to maintain 2–3 inches between frame edges.
- Swap photos easily without new holes.
| Cost | Time | Difficulty | Renter-Friendly |
| $60-$200+ | 2-3 hours | Moderate | Not Typically (requires installation) |
Tip: Use matching cords for a cohesive look.
5. Window Pane Photo Frame (Vintage Charm)
Put old window panes to use with a window pane photo frame. This ensemble of photos, safely nestled behind glass panes, gives an eclectic and nostalgic touch to your space. It’s not just about sustainability but also about showcasing memories in an extraordinary way.
What are the materials needed for a Window Pane Photo Frame?
Get these materials for your window pane photo frame project: old window pane, sandpaper, glass cleaner, photos, acid-free tape or photo corners, hanging hardware
How do you create a Window Pane Photo Frame?
- Sand and clean old window panes; ensure glass is secure.
- Measure panes and trim photos to fit.
- Mount photos behind glass using corners or tape on the backer.
- Hang with anchors appropriate to weight.
| Cost | Time | Difficulty | Renter-Friendly |
| $25-$100 | 1-2 hours | Moderate | Yes (use adhessive hangers if light) |
Safety Tips: Handle glass carefully; wear gloves.
6. String Light Photo Display (Cozy, Budget, Renter-Friendly)
String light photo displays are the perfect way to combine lighting aesthetics with mementos. Attach your favourite snapshots along the length of the lights for an enchanting touch. This display works well in bedrooms or children’s spaces, casting a dreamy glow on your memories.
What are the materials needed to create a String Light Photo Display?
Prepare these materials for your string light photo display: warm LED string lights (10–20 ft), Command hooks, mini clothespins, 4×6 matte prints
How do you create a String Light Photo Display?
- Plan a zig-zag or swag pattern; mark hook spots 18–24 inches apart.
- Apply hooks; wait recommended adhesion time.
- Hang lights; clip photos evenly; keep prints clear of bulbs.
- Add a dimmer or low-lumen LEDs for ambiance.
| Cost | Time | Difficulty | Renter-Friendly |
| $15-$30 | 30-45 min | Easy | Yes |
Tip: Rotate seasonal photos to keep the display fresh.
7. Decorate With Old Door Photo Frames
Lend a rustic yet chic flair to your space as you decorate with old-door photo frames. Transform an old door into a large photo frame that can encompass several photos. This prominent, conversation-starting piece uses space and turns an object into an artistic masterpiece!
What are the materials needed to make Old door Phot Frames?
Prepare these for this projct: reclaimed door, frames or printed collages, screws or heavy-duty adhesive, wall anchor/anti-tip kit
How do you decorate with Old Door Photo Frames?
Steps:
- Clean and refinish door as desired.
- Arrange frames or mount prints directly onto panels.
- Lean against wall and secure with anti-tip strap.
- Add lighting (clip-on or sconce nearby) to highlight.
| Cost | Time | Difficulty | Renter-Friendly |
| $40-$200 | 2-3 hours | Moderate | Yes (lean + anti-tip strap) |
Safety Tip: Distribute weight evenly; anchor.
8. Cork Board Collage (Flexible & Functional)
For a unique mix of functional and decorative displays, try a corkboard collage. Ideal for offices or study spaces, these boards can hold a multitude of photos alongside reminders or notes. The joy of pinning up fresh pictures contributes to an ever-changing testament to your life.
What are the materials needed for this Cork Board Collage?
Here are the materials needed for this project: framed cork board (⅜–½ inch thick), pushpins or T-pins, prints, memo items.
How do you create a Cork Board Collage?
- Hang board centered at ~57–60 inches.
- Curate prints and notes; cluster by theme or color.
- Layer textures (ticket stubs, postcards) for dimension.
- Refresh quarterly to avoid pinholes in the same spots.
| Cost | Time | Difficulty | Renter-Friendly |
| $20-$80 | 30-60 min | Easy | Yes |
Tip: Matte finish reduces fingerprints and glare.
9. Magnetic Fridge Photos (Casual & Fun)
Turn your fridge’s surface into a canvas for your favourite images. Use magnetic pictures that can be easily moved or replaced, giving this fun and functional mode of display its dynamic nature. It nicely fills a bland space and serves as a pleasant reminder of cherished moments.
What are the materials needed for this Magnetic Fridge Photos?
Prepare these materials for this project: printable magnet sheets or magnetic sleeves, photo paper, optional magnetic board if fridge isn’t magnetic
How do you make a Magnetic Fridge Photo
- Print or insert photos into magnetic sleeves.
- Arrange in a grid or ribbon pattern on the fridge.
- For non-magnetic finishes, mount a slim magnetic board nearby.
| Cost | Time | Difficulty | Renter-Friendly |
| $10-$25 | 20-30 min | Easy | Yes |
Tip: Matte finish reduces fingerprints and glare.
10. Coasters Featuring Photos
Unleash your creativity on everyday items with coasters featuring photos. Custom-made coasters displaying personal snapshots aren’t just functional — they’re fun! You can showcase these creative pieces during every gathering, making them instant conversation starters.
What are the materials needed for these Coasters Featuring Photos?
Well, prepare the following materials needed for this project: ceramic/stone coasters, printed photos, Mod Podge (Dishwasher Safe) or epoxy resin, felt pads.
How do you make these coasters featuring photos
- Trim photos to coaster size.
- Adhere with Mod Podge; smooth bubbles.
- Seal with additional coats or epoxy; cure per instructions.
- Add felt pads to protect surfaces.
| Cost | Time | Difficulty | Renter-Friendly |
| $15-$40 | 1-2 hours (plus cure) | Easy | Yes |
Tip: Choose high-contrast images for visibility at small size.
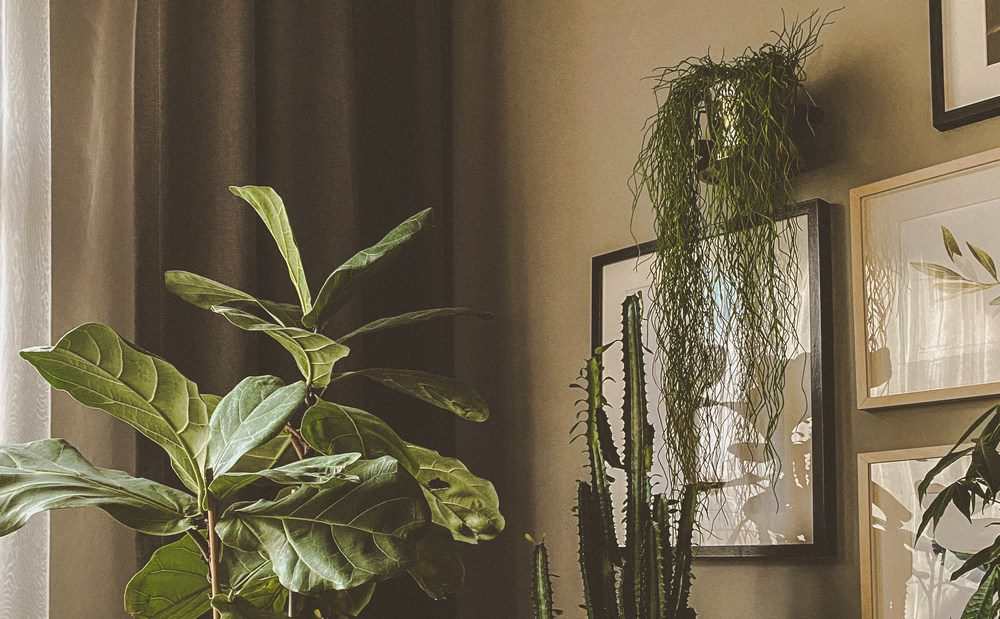
11. Pot Plant Hanging Photos (Green + Memories)
This eccentric idea brings greenery and cherished images together. Attach photos to the branches of your indoor plants or hang them from the pots. It’s a beautiful merger of natural elements with memories that keep your space fresh, lively, and distinctly personalized.
What are the materials needed to make these Pot Plant Hanging Photos?
Here aret he materials needed for this project: indoor plant, twine, mini clips, laminated prints
How do you create a pot plant hanging photos?
- Laminate or use heavier stock to resist humidity.
- Tie twine to stakes or pots; clip lightweight prints.
- Keep photos clear of damp leaves/soil.
| Cost | Time | Difficulty | Renter-Friendly |
| $5-$20 | 15-30 min | Easy | Yes |
Tip: Use black-and-white prints for a chic, minimal look.
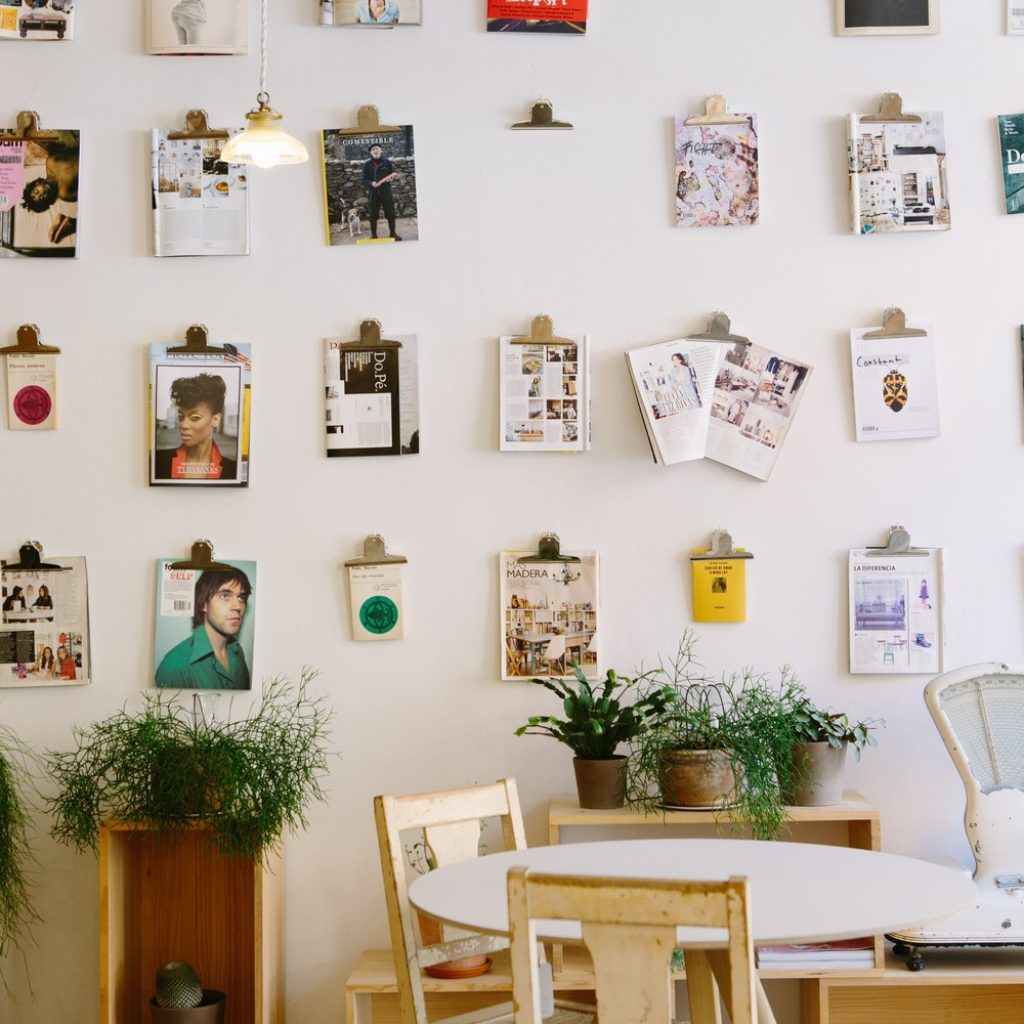
12. DIY Clipboard Galleries (Swap-Friendly)
For craft enthusiasts, DIY clipboard galleries are a must-try. Assemble clipboards on your wall and attach your photos with clips for an appealing display that’s easy to put together. You can switch around photos as and when you please, keeping your memory montage up-to-date.
What are the materials needed for DIY Clipboard Galleries?
Here are the materials needed for this project: 6–12 clipboards (A4/letter), Command strips, prints
How do you make DIY Clipboard Galleries?
- Plan a grid (e.g., 3×3) with 2 inches spacing.
- Mount clipboards with adhesive strips.
- Clip photos; rotate easily for new themes.
| Cost | Time | Difficulty | Renter-Friendly |
| $20-$60 | 45-60 min | Easy | Yes |
Tip: Mix wood and acrylic clipboards for texture play.
13. Print Hangers
Print hangers are wooden strips that grip the top and bottom edges of your photo, giving them a delightful floating effect. Especially suited for large prints, print hangers usher in an element of professional flair without permanently altering the images as traditional frames might.
What are the materials to make Print Hangers?
Prepare these materials for this project: wooden print hangers sized to prints (e.g., 12–20 inches wide), twine or string, nails/adhesive hooks, heavy stock prints.
How do you make Print Hangers?
- Match hanger width to print size; heavier paper resists curl.
- Insert prints into hangers; hang at eye level.
- Arrange in pairs or triptychs for balance.
| Cost | Time | Difficulty | Renter-Friendly |
| $15-$45 per print | 15-30 min | Easy | Yes (Adhesive Hooks) |
Tip: Great for large art photos without heavy frames.
14. Binder Clip Display
Binder clips are no longer confined to your office space. These handy tools can transform into innovative photo display aids to add an industrial edge to your home. Just clip on your favourite photos and hang them from a tack or nail. With a binder clip display, creativity knows no bounds!
What are the materials needed to make Binder Clip Display?
Prepare these materials for this project: small binder clips, nails or adhesive hooks, protective archival tabs (optional)
How do you create a Binder Clip Display?
- Attach archival tabs behind print tops to avoid indentations.
- Clip prints; hang from nails or hooks in a row or grid.
- Mix clip finishes (black, brass) to match decor.
| Cost | Time | Difficulty | Renter-Friendly |
| $5-$15 | 15-30 min | Easy | Yes |
Tip: Works well along hallways or above consoles.
15. Photo Easel
No wall space? No problem! Show off your cherished photographs with the help of photo easels. They’re ideal for placement on bookshelves, mantles, desks, or wherever you think they’ll add that perfect personal touch. Photo easels offer a simple and tasteful solution to beautify a space.
What are the materials needed to make a Photo Easel?
Prepare these materials: mini easels (4–8 inch), mounted prints or small frames
How to create a Photo Easel?
- Choose easel size to match print width.
- Place on shelves, mantels, or consoles; avoid crowding edges.
- Angle slightly to reduce glare.
| Cost | Time | Difficulty | Renter-Friendly |
| $10-$40 | 10-20 min | Easy | Yes |
Tip: Use consistent frame color across a shelf for cohesion.
16. Frame Using Washi Tape
Get creative with your home decor by using washi tape. This decorative adhesive tape is available in numerous colours and patterns, making it fun to play with! Simply stick it around your images to create quirky border designs. A perfect blend of artistic flair and effortless DIY charm!
What are the materials needed to make Frames made of Washi Tape?
Prepare these materials: washi tape (varied widths/patterns), prints, level
How do you Create Washi Tape Frames?
- Test a small area to ensure paint-safe removal.
- Create borders with mitered corners; keep lines straight with a level.
- Build a mini gallery with coordinated tape colors.
| Cost | Time | Difficulty | Renter-Friendly |
| $5-$20 | 20-40 min | Easy | Yes |
Tip: Choose matte, painter-friendly washi for clean removal.
17. Repurpose a Screen or Fencing
Lend your home a rustic charm by repurposing an old screen or garden fencing to display your pictures. Fasten your cherished snapshots with stylish frames for a truly unique display. It’s not just about preserving memories but embracing creativity by sprucing up ordinary objects.
What are the materials needed for Repurposing a Screen or Fencing?
Here are the materials needed for this project: old screen or wire fencing, sandpaper, rust-inhibiting paint (if metal), S-hooks or clips, anchors
How to repurpose a screen or fencing to display your pictures?
Steps:
- Clean, sand, and seal or paint the piece.
- Mount securely on wall studs/anchors.
- Hang photos with mini clips or S-hooks for a grid effect.
| Cost | Time | Difficulty | Renter-Friendly |
| $25-$120 | 1-2 hours | Moderate | Limited (requires solid mounting) |
18. Line Prints on a Photo Ledge (Layered & Changeable)
Photo ledges provide a chic way to display your pictures. Not only are they stylish, but they also allow you to regularly change out displays hassle-free. By lining up multiple ledges at variegated heights, you create an engaging visual journey, breathing new life into your living space.
What are the materials needed to make Line Prints on a Photo Ledge?
Prepare these materials for this project: 2–3 photo ledges, mixed frames/prints.
How to create Line Prints on a Photo Ledge?
- Install ledges 10–12 inches apart vertically.
- Place largest frames toward the back; layer smaller in front.
- Maintain variety in height and orientation for rhythm.
| Cost | Time | Difficulty | Renter-Friendly |
| $40-$150 | 1-2 hours | Easy – Moderate | Sometimes |
Tip: Keep color palette to 2–3 tones for a curated feel.
19. Photo Blocks (Tactile & Playful)
For a unique twist on photo displays, consider printing your photos onto wooden blocks. This idea offers endless fun arranging possibilities. Whether stacked on shelves, spread on mantles, or clustered atop drawers, photo blocks deliver an unbeatable blend of rustic and modern style.
What are the materials needed for Photo Blocks?
Here are the materials needed for this project: sanded wood blocks, printed photos, gel medium or direct print service, sealer (polycrylic).
How to create photo blocks?
- Sand and wipe blocks; ensure edges are smooth.
- Adhere prints (gel transfer or direct mounting).
- Seal with clear coat; let dry fully.
- Stack and arrange on shelves or mantels.
| Cost | Time | Difficulty | Renter-Friendly |
| $15-$50 | 1-2 hours | Easy | Yes |
Tip: Black-and-white photos pair nicely with natural wood.
20. Shadow/Display Box (Depth and Storytelling)
If you’re looking for a more dynamic photo display idea, consider using a shadow box. By framing your favourite pictures in these freestanding boxes, you add an appealing depth to your displays. Not just a beautiful showcase, display boxes also serve as conversation starters.
What are the materials needed for this Shadow/Display Box?
Here are the materials needed for this project? shadow box (1.5–3 inch depth), photos, memorabilia, archival mounting squares, backdrop paper/fabric.
How to create a Shadow/Display Box?
- Plan a layered composition with a focal photo.
- Mount backdrop; add photos and small objects in layers.
- Secure with archival adhesives; close and hang.
| Cost | Time | Difficulty | Renter-Friendly |
| $20-$80 | 45-90 min | Easy-Moderate | Yes (adhesive hangers for lighter boxes) |
In Conclusion…
Your photos tell your story — these 20 display ideas help you share it beautifully, on any budget and in any space. Start with a renter-friendly option like string lights or washi tape, or go big with a cohesive gallery wall. Mix textures, vary scales, and refresh seasonally to keep your living room feeling personal and alive.
FAQs
- What’s the cheapest way to display photos without frames?
- Washi tape frames, binder clip displays, and string light clips are all under $20 and renter-friendly. They’re quick to set up and easy to swap.
- How do I hang photos without damaging walls?
- Use Command strips/hooks sized for the weight, washi tape on lightweight prints, or lean displays (ladders, large framed pieces). Always follow adhesive cure times and weight limits.
- How high should I hang a gallery wall above a sofa?
- Keep the bottom of the arrangement 6–10 inches above the sofa back, and aim for the gallery’s visual center at ~57–60 inches from the floor.
- What layout works best for a gallery wall?
- For a clean look, use a grid with identical frames. For a collected feel, mix sizes in a balanced shape—start at the center and keep 2–3 inches between frames.
- What paper and size should I print for ledges and hangers?
- Heavier stock (e.g., 200–300 gsm) resists curl, especially for print hangers. Common sizes: 8×10 and 11×14 for ledges; 12–20-inch-wide hangers for larger prints.