Last Updated on December 16, 2025 by teamobn
Chickens are some of the best helpers you can have in a garden. They shred compost, pluck weeds, move mulch, and happily dig holes for you. In return, you need to keep them safe, dry, and comfortable. One of the cheapest ways to do that is to build a pallet chicken coop.
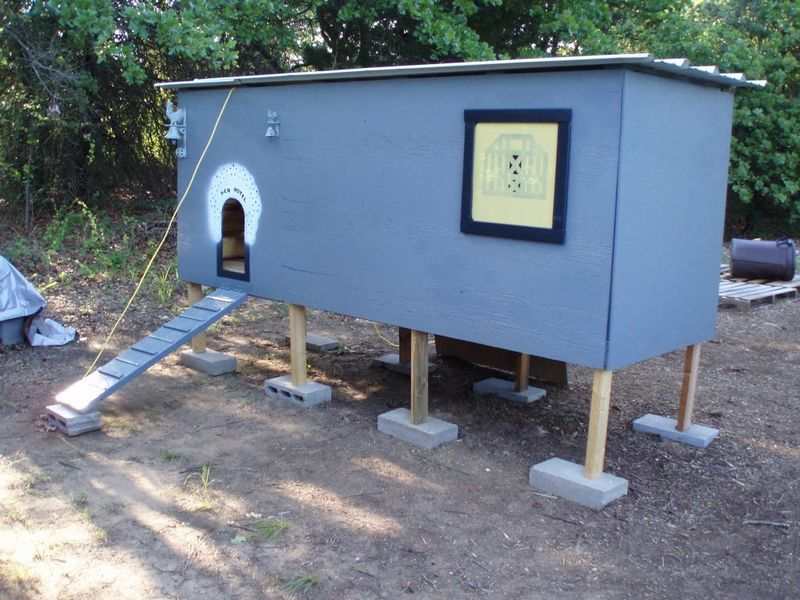
A pallet chicken coop uses recycled wooden pallets as the main structure. You do not need to dismantle the pallets if they are the same size. You can simply join them together. This makes the coop sturdy, budget friendly, and beginner friendly.
In this guide you will learn how to build a DIY pallet chicken coop step by step. You will see what materials and tools you need, how many pallets to use, and how to insulate, ventilate, and predator proof the coop. By the end, you will have a safe, practical home for your hens and a steady supply of fresh eggs.
Quick Overview: DIY Pallet Chicken Coop
Best for: Small backyard flocks of about 3 to 6 hens
Difficulty: Beginner to intermediate DIYer
Build time: About 1 to 2 days
Estimated cost: Low, if pallets are free
Main benefits: Cheap, recycled materials, easy to customize, strong frame
Key steps
- Choose safe, sturdy pallets and a level site
- Build and bolt together the pallet frame
- Add a plywood floor and a solid roof
- Install a door, window, and secure latches
- Add nesting boxes and perches for roosting
- Insulate and ventilate for year-round comfort
- Predator-proof the coop and check for gaps
- Decorate and maintain your coop so it lasts
A Simple Guide to DIY Pallet Chicken Coop Building
Are you thinking about getting chickens for your backyard? A pallet chicken coop is a great first project. You do not need to be a master builder or own a full workshop. With some basic tools, a few reused pallets, and a bit of time, you can build a strong and attractive coop.
This guide walks you through every step in clear, simple language. You will see how to prepare the site, build the frame, and finish the inside of the coop so your hens stay healthy and happy. If you enjoy DIY projects or just want fresh eggs from your own flock, this is a fun way to get started.
What materials are needed to build a DIY Pallet Chicken Coop Building
- Pallets in good condition
- 1/2 inch plywood
- 18 inch square glass for a window
- Rope
- Bolts, Hex Nuts, and Washers
- Waterproof Wood Glue
- Cement Blocks
- Door Handles
- Paint that is non-toxic and water-based
- Magnet Latches
- Hardware cloth for windows and vents (recommended for predator proofing)
- Screws and nails suitable for outdoor use
What Tools Are Needed
- Jig Saw
- Hand saw (optional)
- Measuring tape and pencil
- Power drill with drill bits and screwdriver bits
- Wrench
- Paintbrush and paint tray
- Safety gear such as gloves and eye protection
How to Build a DIY Pallet Chicken Coop Building
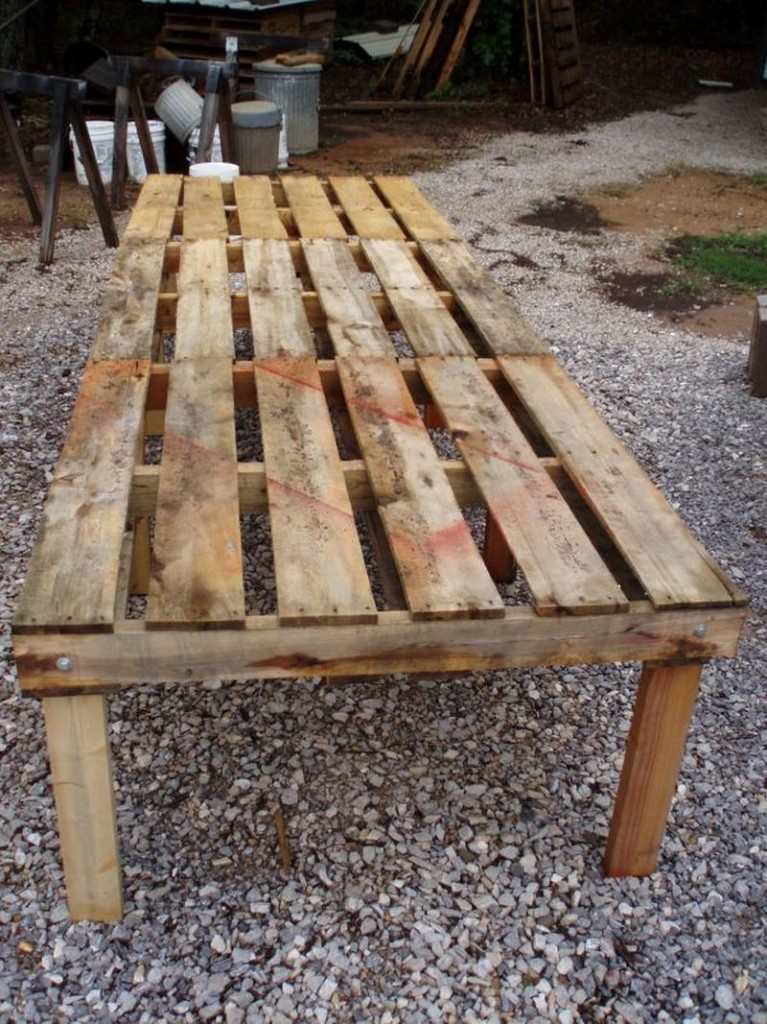
Step 1: Prepare the Site and Materials
First, choose a level spot in your garden or yard for the chicken coop. The area should drain well so water does not pool around the coop. If possible, choose a location that gets morning sun and some afternoon shade.
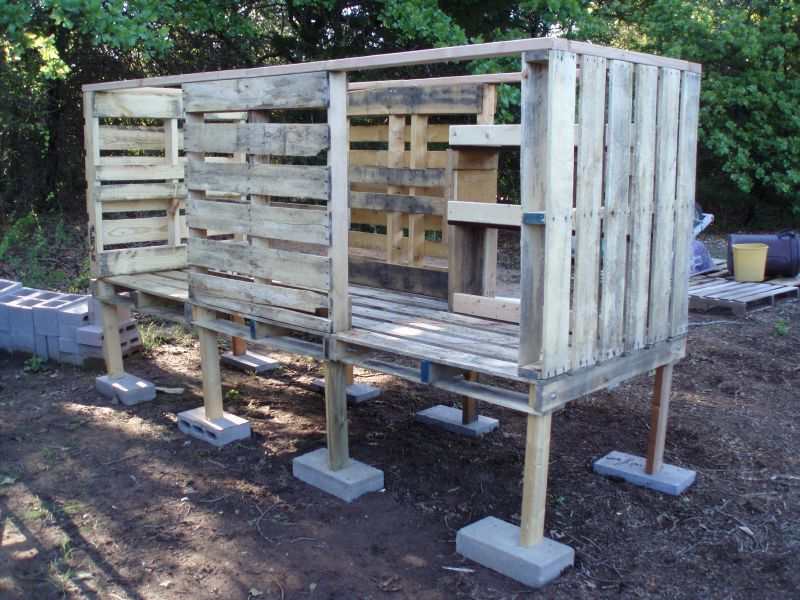
Clear away grass, rocks, and debris. Lay down cement blocks to create a raised foundation. This protects the coop from ground moisture and helps discourage digging predators.
Next, collect enough pallets for your project. For a small flock of 3 to 6 hens, plan on at least 6 to 8 standard pallets. Inspect each pallet carefully. Choose ones that are strong, dry, and free of rot, deep cracks, or heavy stains. Avoid pallets with a strong chemical smell.
Step 2: Build the Frame
In this step, you create the basic walls and shape of your coop.
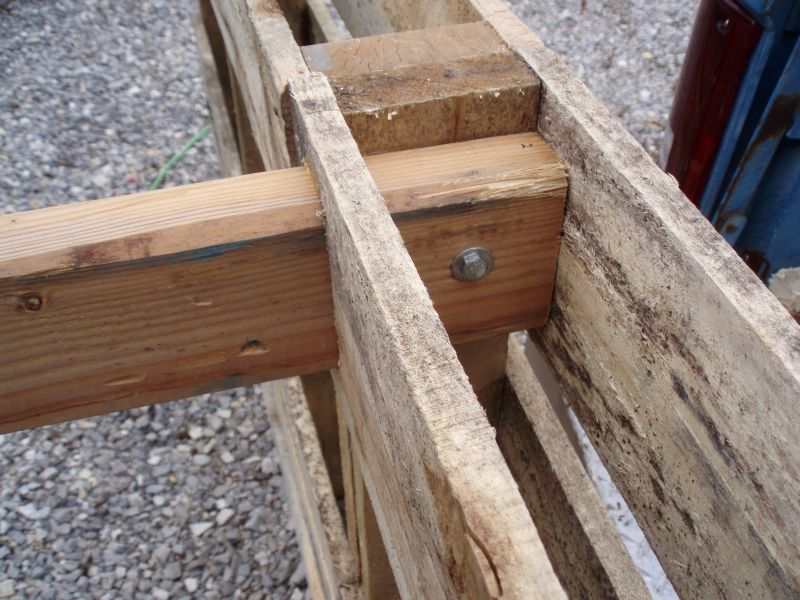
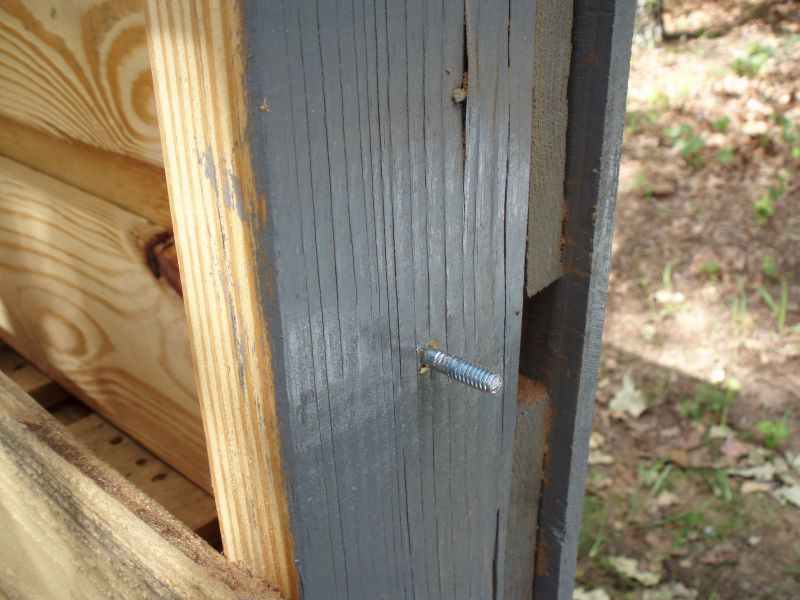
Arrange four pallets upright to form a rectangle or square. These will be the walls. Check that they are the same size so the corners meet cleanly. Use a measuring tape to make sure the frame is square. Diagonal measurements from corner to corner should match.
Drill holes through the pallet corners where they meet. Bolt the pallets together using bolts, hex nuts, and washers. Tighten the bolts with a wrench until the frame feels solid.
If you want a taller coop or a larger footprint, you can stack pallets or add more pallets to extend the sides. Just be sure each connection is tightly bolted and stable.
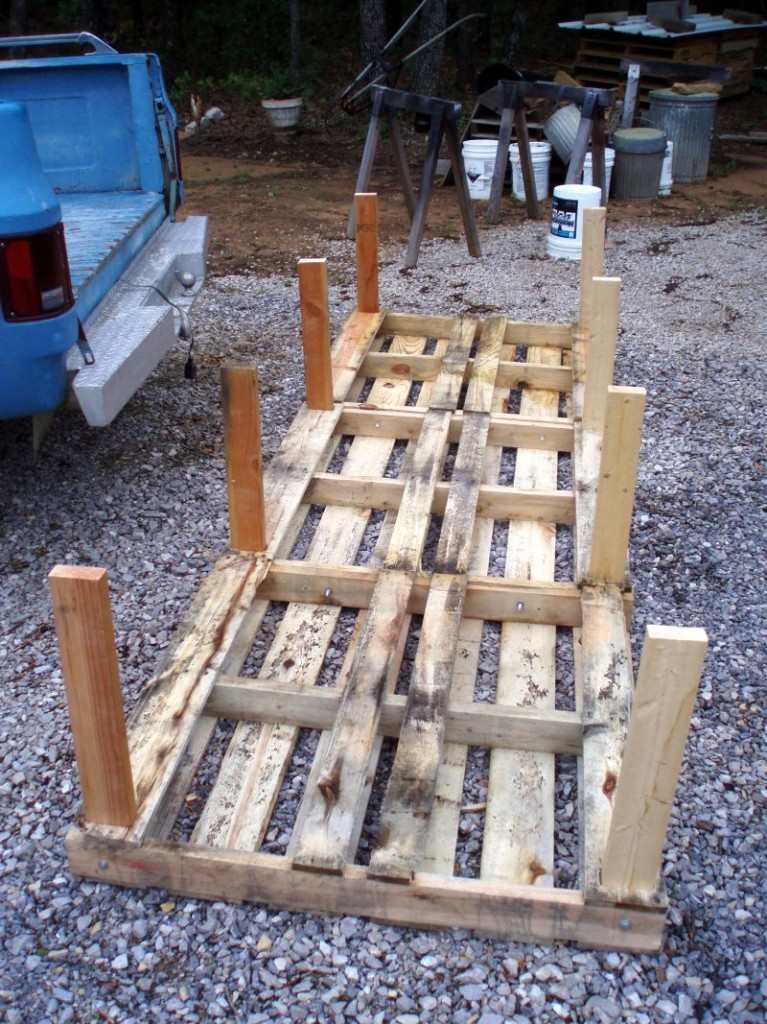
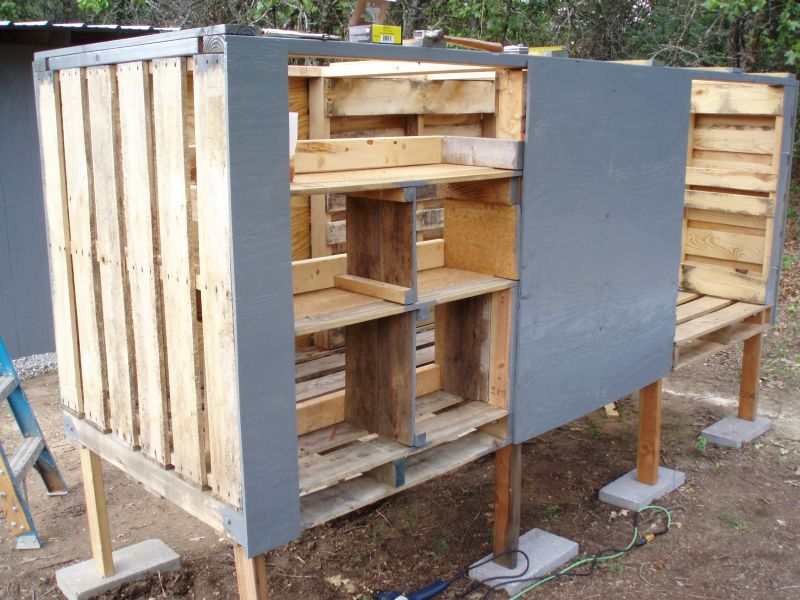
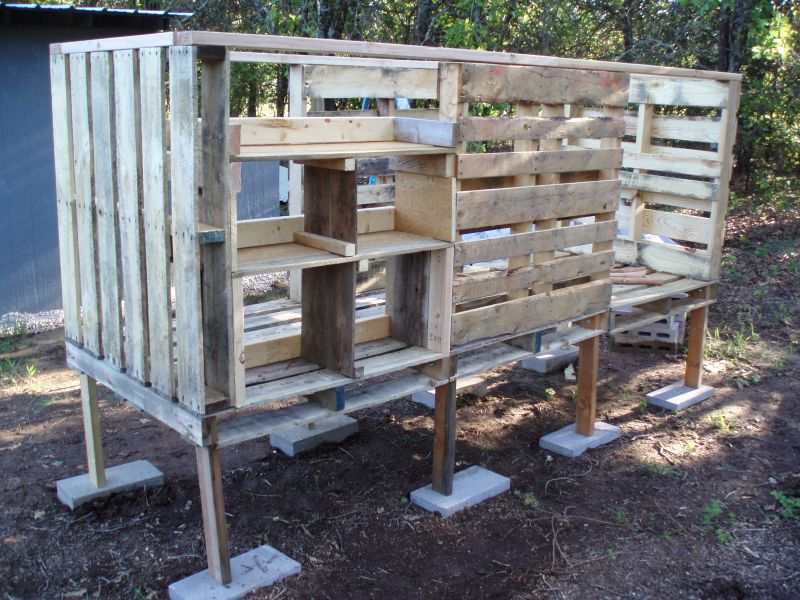
Step 3: Add the Floor and Roof
Now you will give the chickens a dry floor and a roof that sheds water.
Measure the inside dimensions of the frame. Cut pieces of 1/2 inch plywood to fit the floor area. Place the plywood on top of the lower pallet slats or support boards. Attach the plywood securely with waterproof wood glue and screws.
For the roof, you have two main options:
- Attach two pallets at an angle to form a simple pitched roof that allows rainwater to run off
- Use plywood sheets to create a flat or slightly sloped roof and then cover it with roofing material such as shingles, metal, or a waterproof membrane
Whichever style you choose, make sure the roof overhangs the walls slightly to keep rain from running straight down the sides.
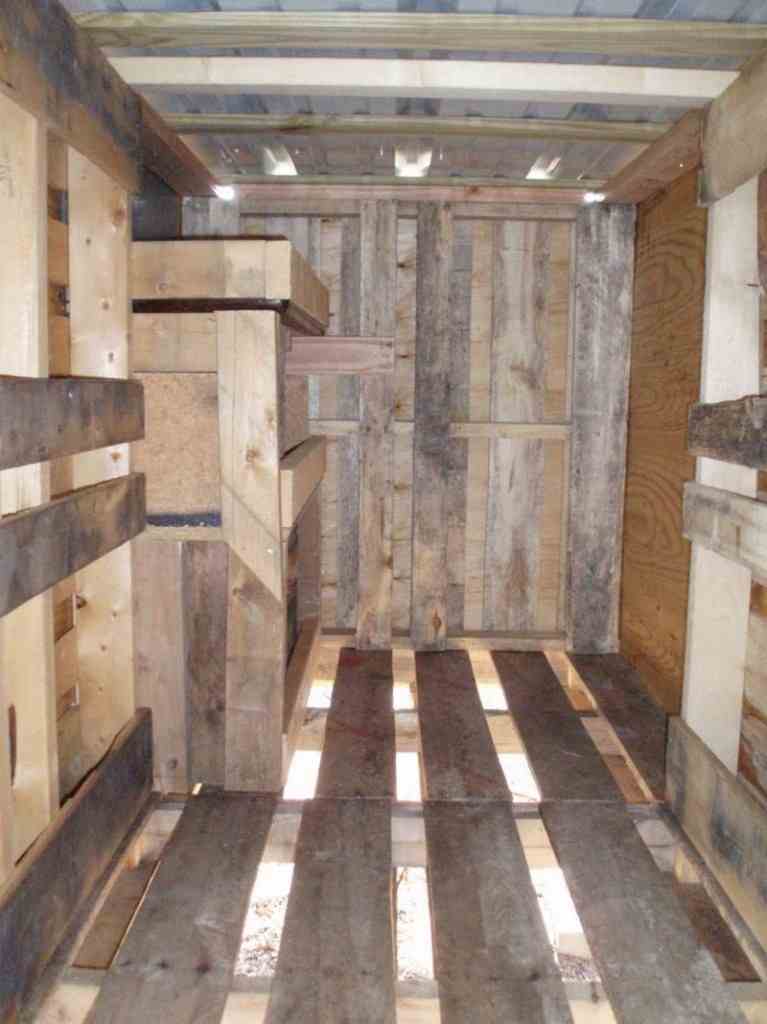
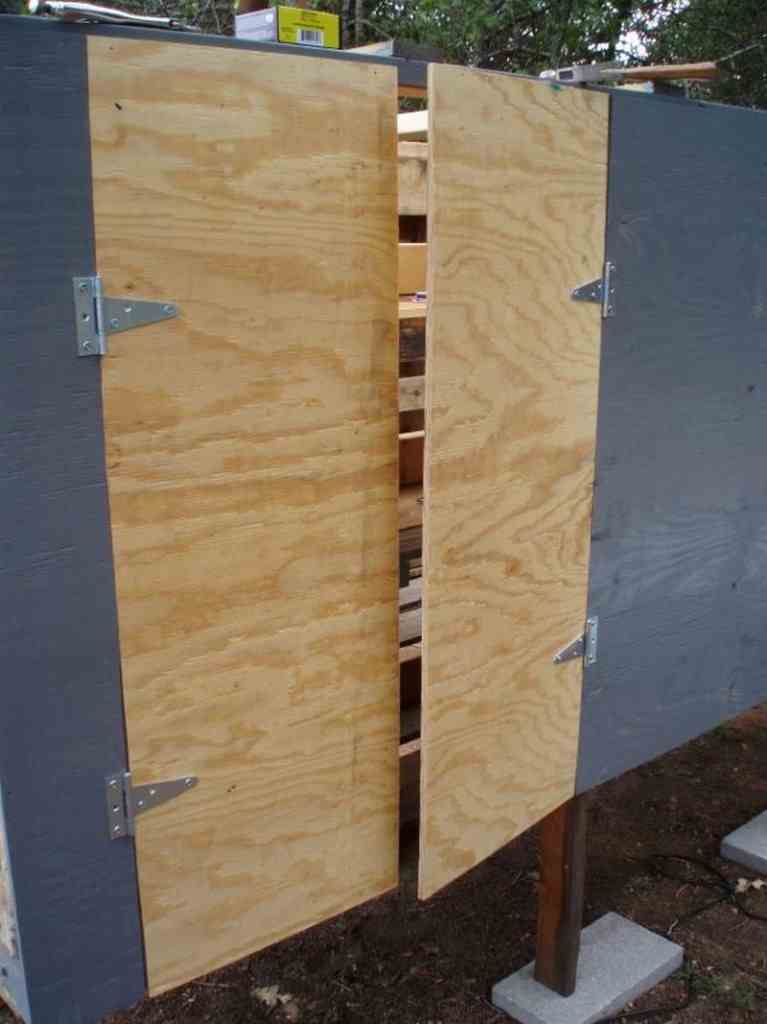
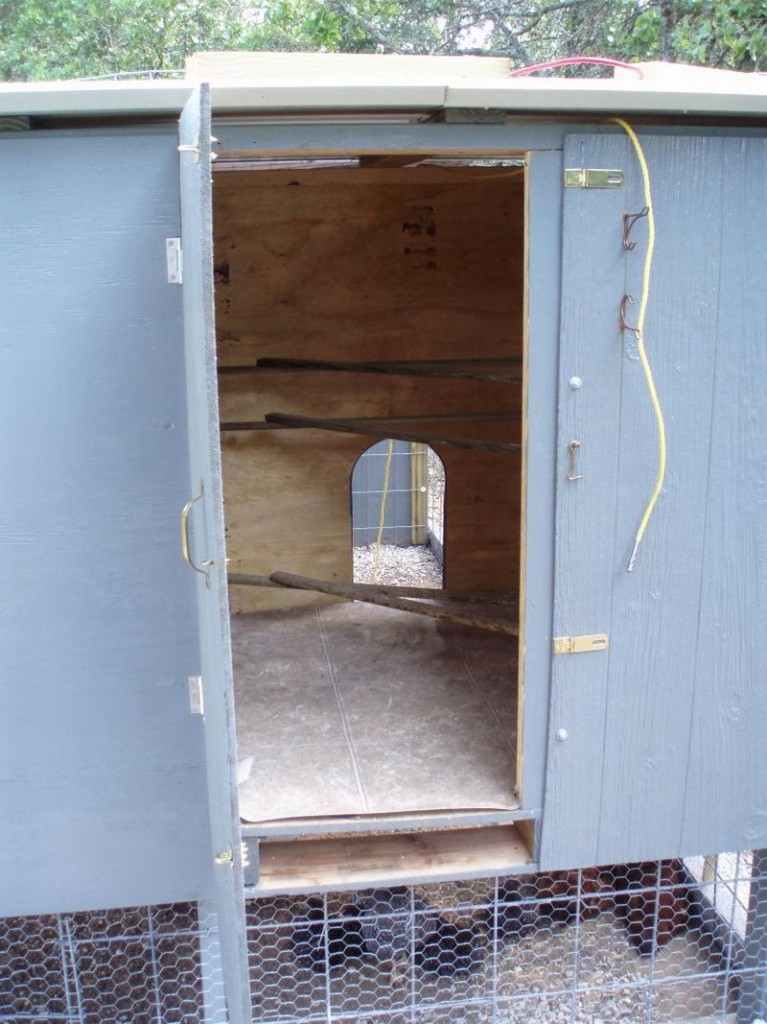
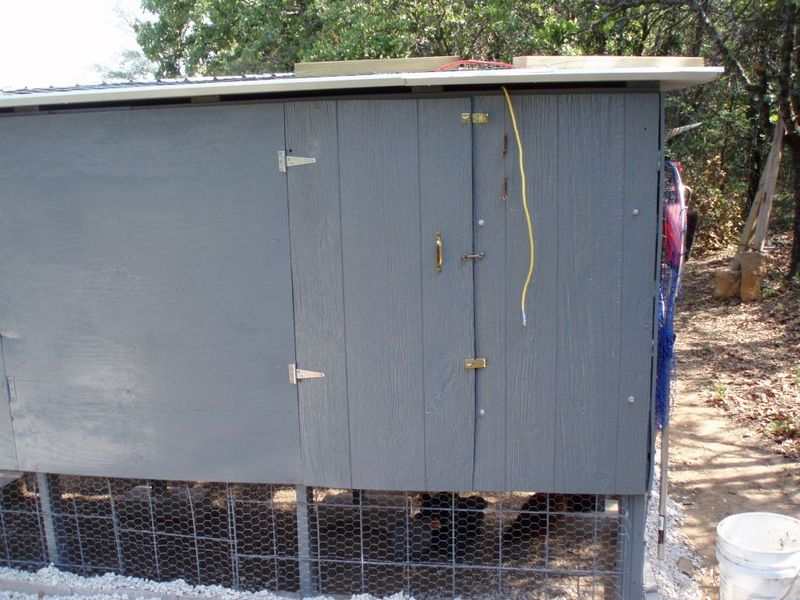
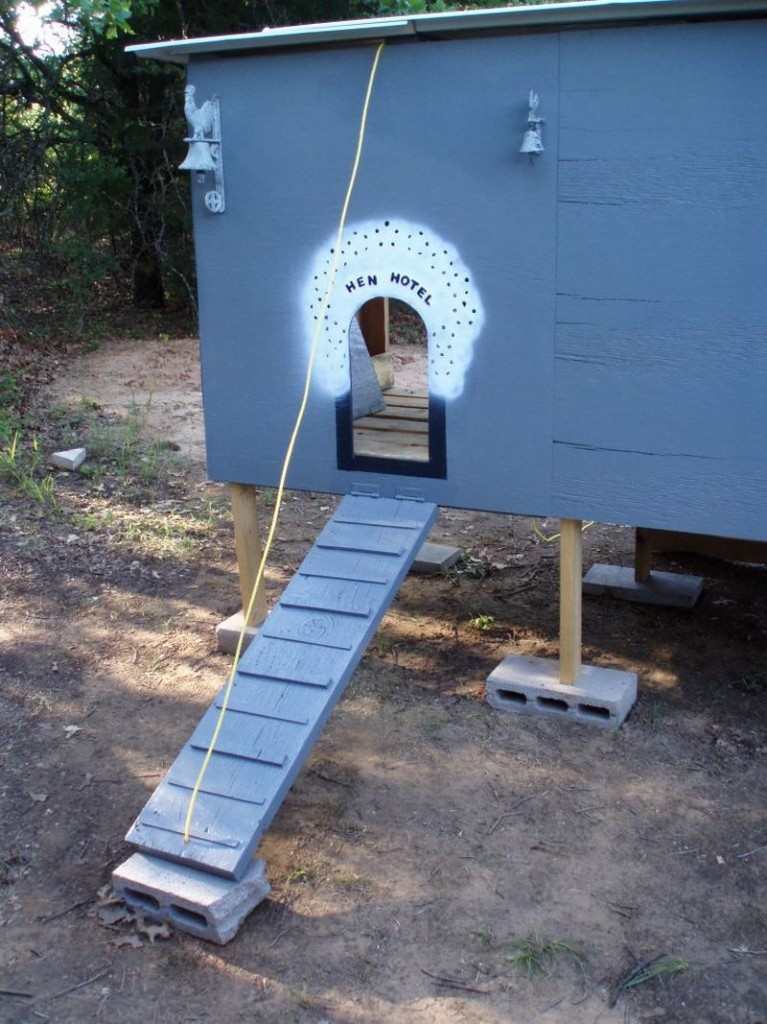
Step 4: Install the Door and Windows
A good door and window make the coop safe, bright, and easy to use.
Decide where you want the main access door for cleaning and checking on your chickens. Use a pencil to mark the outline of the door on one pallet wall. With a jigsaw, carefully cut out the opening.
Use the cut piece or another piece of pallet wood as the door itself. Attach it to the frame using sturdy hinges. Screw on a door handle so you can open and close it easily. Add strong latches or magnet latches so the door closes tightly.
Next, mark a space for the 18-inch square glass window. Cut the opening with the jigsaw. Fit the glass into the opening and secure it with waterproof wood glue and pallet wood strips as a frame. If you live in a very cold or very hot climate, consider adding a window that can open for extra airflow.
Cover any openings with hardware cloth on the inside of the coop to keep predators out while still allowing light and air.
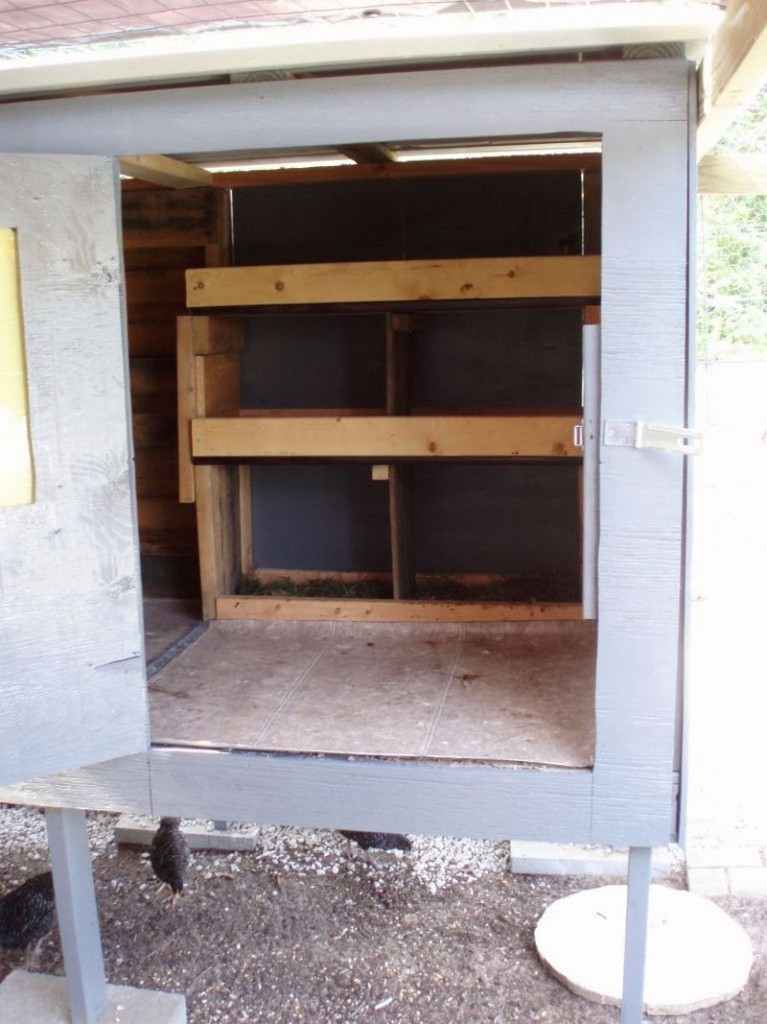
Step 5: Add Nesting Boxes and Perches
Chickens need nesting boxes to lay eggs and perches to roost at night.
Use the remaining plywood to build nesting boxes. Each box should be about 12 inches wide, 12 inches tall, and 12 inches deep. Provide at least one nesting box for every three or four hens. Mount the boxes slightly off the floor along a wall. Make sure you can reach them easily from the outside or from the main door for egg collection.
For perches, use sturdy pallet boards or branches. Place them horizontally across the coop, higher than the nesting boxes. Each hen should have about 8 to 10 inches of perch space. Perches should be wide enough so the chickens can rest with their feet flat and feel stable.
Step 6: Insulate and Ventilate the Coop
Insulation and ventilation keep your flock comfortable in every season.
To insulate, you can use foam board, fiberglass batts, or recycled denim insulation. Fit the insulation between the pallet boards or behind an inner wall of plywood. Focus on the walls, roof, and floor. Cover any exposed insulation so chickens cannot peck at it.
Ventilation is just as important as warmth. Fresh air removes moisture and ammonia from droppings. This protects the chickens from breathing problems and keeps the coop dry.
Install vents high on the walls near the roof to let warm, moist air escape. Add smaller vents or gaps near the floor so cooler air can enter. Make sure the airflow does not create a strong draft directly on the birds. Cover all vents with hardware cloth to keep predators out.
Windows that can open and close are also useful. You can open them on warm days and close them during storms or very cold nights.
Step 7: Secure and Predator-Proof the Coop
Predator protection is critical. Many animals, such as raccoons, foxes, dogs, and rats, will test your coop for weak points.
Use hardware cloth instead of chicken wire for all windows, vents, and lower wall openings. Hardware cloth has smaller openings and is much stronger.
Attach a skirt of hardware cloth around the base of the coop. Bury it 8 to 12 inches deep and bend it outward away from the walls. This makes it hard for predators to dig into the coop.
Use sturdy latches on all doors and access panels. Simple hook latches are often easy for raccoons to open. Choose latches that can be locked with a carabiner or padlock if needed.
Walk around the coop and check for gaps, loose boards, or holes where a small animal could squeeze through. Seal these with more wood, screws, or hardware cloth.
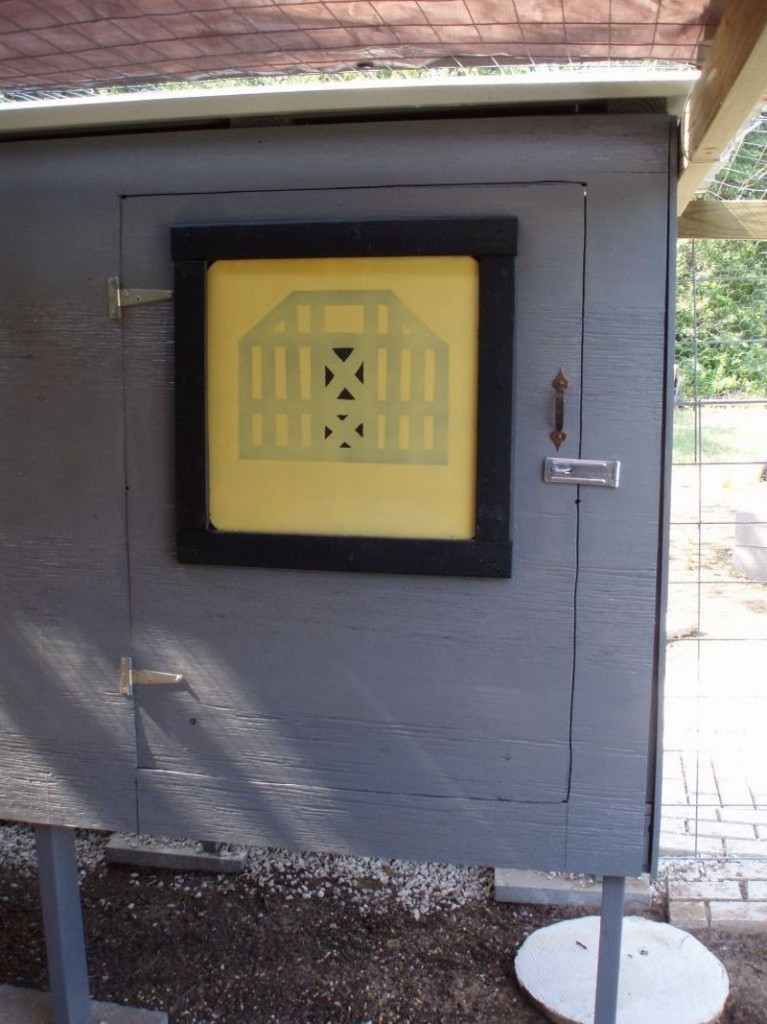
Step 8: Paint, Decorate, and Add Final Details
Now you can protect and personalize your pallet chicken coop.
Paint the exterior with non-toxic, water-based paint. Paint helps seal the wood against moisture and makes cleaning easier. Light colors reflect heat and can keep the coop cooler in summer.
Let the paint dry completely. Then add any decorations you like such as hanging flower pots, house numbers, or solar lights near the door.
Use magnet latches on the door and nesting box lids so they stay closed but open easily when you collect eggs or clean. Wrap rope around roof edges or posts to add a rustic look and to hide rough edges.
Once everything is dry and secure, add bedding inside the coop and move your chickens into their new home.
You can totally whip up a kickass coop that will keep your feathery companions clucking with joy, whether you’re a pro-DIY-er or a beginner to the coop game. Check out these free chicken coop plans, and you’ll have a coop that’s both functional and stylish in no time.
Click on any image to start the lightbox display. Use your Esc key to close the lightbox. You can also view the images as a slideshow if you prefer 😎
Are Pallets Safe to Use for a Chicken Coop
Pallets can be safe for chickens if you choose them carefully.
Look for pallets marked with HT, which stands for heat-treated. Heat-treated pallets are treated with high temperatures instead of chemicals. Avoid pallets marked MB, which stands for methyl bromide. This chemical treatment is toxic.
Choose pallets that are clean and dry. Do not use pallets with heavy stains, strong chemical smells, or signs of mold and rot. If you are not sure what a pallet was used for before, it is safer to leave it out of the coop.
By selecting high-quality, untreated pallets, you give your chickens a stable and safe structure to live in.
Practical Tips for a Better Pallet Chicken Coop
If you are ready to build your own pallet chicken coop, keep these practical tips in mind for the best results.
1. Choose Sturdy Pallets
- Inspect each pallet for cracks, broken boards, soft spots, or missing pieces
- Avoid pallets that have been stored outdoors for a long time and are badly weathered
- Prefer pallets marked HT with minimal stains
- Sand down any rough edges or splinters where you and your chickens will touch the wood
Selecting strong pallets gives your coop a solid base and helps it last for years.
2. Plan Coop Size for Your Flock
As a general rule:
- Provide at least 3 to 4 square feet of indoor coop space per hen
- Provide 8 to 10 square feet of outdoor run space per hen if you add a run
If you have 4 hens, aim for about 12 to 16 square feet inside the coop. This might be a 4 by 4 foot space or similar.
Planning the size before you build helps you gather enough pallets and design a coop that does not feel crowded.
3. Incorporate Easy Access Points
Build in simple access so daily care is easy.
- Use a large, clean outdoor area for you to enter and scoop bedding
- Add a smaller chicken door with a ramp at the right height for your birds
- Consider a hinged roof panel or lift-up lid above the nesting boxes for quick egg collection
Good access points save time, reduce stress on the chickens, and make it more likely you will keep up with cleaning.
4. Provide Adequate Nesting Boxes and Perches
Nesting boxes and perches should match the size and habits of your flock.
- Provide one nesting box for every three or four hens
- Place nest boxes in a darker, quieter part of the coop
- Mount perches higher than the nesting boxes since chickens like to roost above ground level
- Make sure perches are smooth but not slippery so the birds can grip them
A comfortable roosting and laying area keeps your hens calmer and more productive.
Regular Maintenance of Pallet Chicken Coop
A clean, well-kept coop is essential for healthy chickens. Set up a simple schedule for checks and cleaning.
Perform routine checks
Once a week, walk around your coop and look for:
- Loose boards or screws
- Chewed edges or new holes that might show pests
- Signs of digging around the base
- Leaks or damp spots inside after rain
Fixing small problems early prevents larger damage and keeps the coop secure.
Clean bedding and waste
Remove dirty bedding, droppings, and old food every day or at least several times a week, depending on your flock size. Replace with fresh, dry bedding such as straw, wood shavings, or hemp.
Regular cleaning:
- Reduces odor
- Limits flies and other insects
- Lowers the risk of parasites and disease
Disinfect regularly
Once a month or as needed, plan a deeper clean.
- Remove all bedding and scrape dried droppings from surfaces
- Wash walls, floor, nesting boxes, and perches with a safe, non-toxic disinfectant
- Allow everything to dry completely before adding fresh bedding and letting chickens back in
Choose a disinfectant that is safe for animals and follow the directions on the label.
Monitor for pests
Watch for signs of mites, lice, rodents, or insects.
- Check chickens’ skin and feathers for tiny moving spots or patches of missing feathers
- Look for droppings and gnaw marks from rodents
- Store feed in metal or heavy plastic bins with tight lids
Keeping the area clean and sealing gaps in the coop will help keep pests under control.
Maintain feeding and watering equipment
Empty and scrub feeders and waterers often. Dirty food and water can spread illness quickly through a flock.
Check:
- That waterers are not leaking or clogged
- That feeders are not rusted, cracked, or tipped over
- That there is enough space for all birds to eat and drink without crowding
Fresh water and clean feed are two of the most important parts of flock health.
Conclusion
A pallet chicken coop is one of the cheapest and most flexible ways to house a small backyard flock. By choosing sturdy heat treated pallets, planning the right coop size for your hens, and following simple steps for building, insulation, ventilation, and predator protection, you can create a safe home that lasts for years.
This guide has shown you how to prepare the site, build the pallet frame, add a floor and roof, install doors and windows, and set up nesting boxes and perches. You have also seen how to maintain the coop so it stays clean, dry, and secure.
If you follow these steps and tips, you can build a DIY pallet chicken coop that keeps your hens healthy and productive and rewards you with fresh eggs from your own backyard.
If you liked this project, you will also enjoy exploring other DIY pet homes and backyard projects that make the most of recycled materials and small spaces.
FAQ on Building and Maintaining a Pallet Chicken Coop
- What materials do I need to build a pallet chicken coop?
- To build a pallet chicken coop, you will need pallets, 1/2 inch plywood, an 18-inch square glass window, rope, bolts, hex nuts, washers, waterproof wood glue, cement blocks, door handles, non-toxic paint, magnet latches, and hardware cloth. Basic tools such as a drill, saw, wrench, and paintbrush are also required.
- How many pallets do I need for a pallet chicken coop?
- For a small coop that houses about 3 to 6 hens, expect to use around 6 to 8 standard pallets. Four pallets form the walls, and the remaining pallets or extra wood can be used for the roof and added framing. Larger flocks and larger coops will need more pallets.
- How do I choose the right pallets for my chicken coop?
- Choose pallets that are sturdy, straight, and free from rot or deep cracks. Look for heat-treated pallets marked HT instead of chemically treated pallets. Avoid pallets with strong chemical smells, heavy stains, or signs of mold. Pallets that have been stored indoors or under cover are usually safer and stronger.
- How can I ensure my pallet chicken coop is well insulated and ventilated?
- Insulate your coop by adding foam board, fiberglass batts, or recycled denim insulation to the walls, roof, and floor. Cover insulation so the chickens cannot peck at it. For ventilation, install vents near the roof and near the floor. Add opening windows if possible. This allows fresh air to flow through the coop while still keeping it warm and dry.
- How many nesting boxes and perches do I need?
- Provide at least one nesting box for every three to four hens. Each box should be about 12 by 12 by 12 inches. For perches, give each hen 8 to 10 inches of space on a sturdy bar or branch. Place perches higher than the nesting boxes so chickens choose to sleep on the perches instead of in the boxes.
- How do I protect my pallet chicken coop from predators?
- To protect your coop, cover all windows, vents, and openings with hardware cloth. Bury a hardware cloth skirt 8 to 12 inches into the ground around the coop. Use strong latches on all doors and access panels, and add carabiners or locks if raccoons or similar predators are common in your area. Inspect the coop regularly for gaps and repair them right away.
- How much does it cost to build a pallet chicken coop?
- Costs vary by location and by the materials you already have. If you can find free pallets, you mainly pay for plywood, hardware cloth, screws, bolts, paint, and roofing material. For a small backyard coop, many people can build one for a modest amount compared to buying a pre-made coop.
- Can I use a pallet chicken coop in cold or hot climates?
- Yes, but you will need to adjust the design. In cold climates, focus on insulation, draft-free ventilation, and a wind-protected location. In hot climates, provide lots of shade, extra vents, and plenty of cool water. In all climates, avoid sealing the coop so tightly that moisture cannot escape.