An undermount kitchen sink delivers a sleek, modern look and makes countertop cleanup effortless by eliminating the raised rim. Installing an undermount kitchen sink is manageable for a careful DIYer, but it requires precise measuring, solid support, and watertight sealing.
In this guide, you’ll learn how to prep the countertop, mount and align the sink, secure it properly, and connect the plumbing without leaks. We’ll also cover common mistakes, maintenance tips, and when to call a pro.
Contents
Installing an Undermount Kitchen Sink
Installing an undermount kitchen sink demands precise alignment, solid support, and watertight sealing. This guide lists required materials and tools, then walks you through each step for a seamless result.
Materials
- Undermount kitchen sink
- Mounting clips/brackets/rails (per manufacturer)
- Epoxy or stud anchors (for stone/solid-surface countertops, as specified)
- 100% silicone sealant (kitchen/bath grade)
- Painter’s tape
- Denatured alcohol or acetone (surface prep)
- Basket strainer assembly
- Plumber’s putty (if required by strainer)
- Tailpiece, P-trap, and extension as needed
- Supply lines and PTFE (Teflon) tape
- Optional: shims
Tools
- Drill/driver and appropriate bits
- Screwdrivers
- Adjustable wrench and channel-lock pliers
- Caulk gun
- Putty knife and utility knife
- Level and tape measure
- Clamps or sink support bars (or 2×4 braces with F‑clamps)
- Bucket, towels, and flashlight
- Safety glasses and gloves

Step-by-Step Guide
- Shut off water and power (for disposer), clear the cabinet, and protect the countertop and floor.
- Dry‑fit the sink. Verify cabinet clearance and desired reveal (positive/zero/negative). Mark centerlines and reveal with painter’s tape.
- Lay out and install anchors, rails, or clip hardware per the sink/countertop manufacturer’s instructions.
- Clean/degrease the sink flange and underside of the countertop with alcohol/acetone. Let dry completely.
- Apply a continuous, even bead of 100% silicone around the cutout underside or the sink flange.
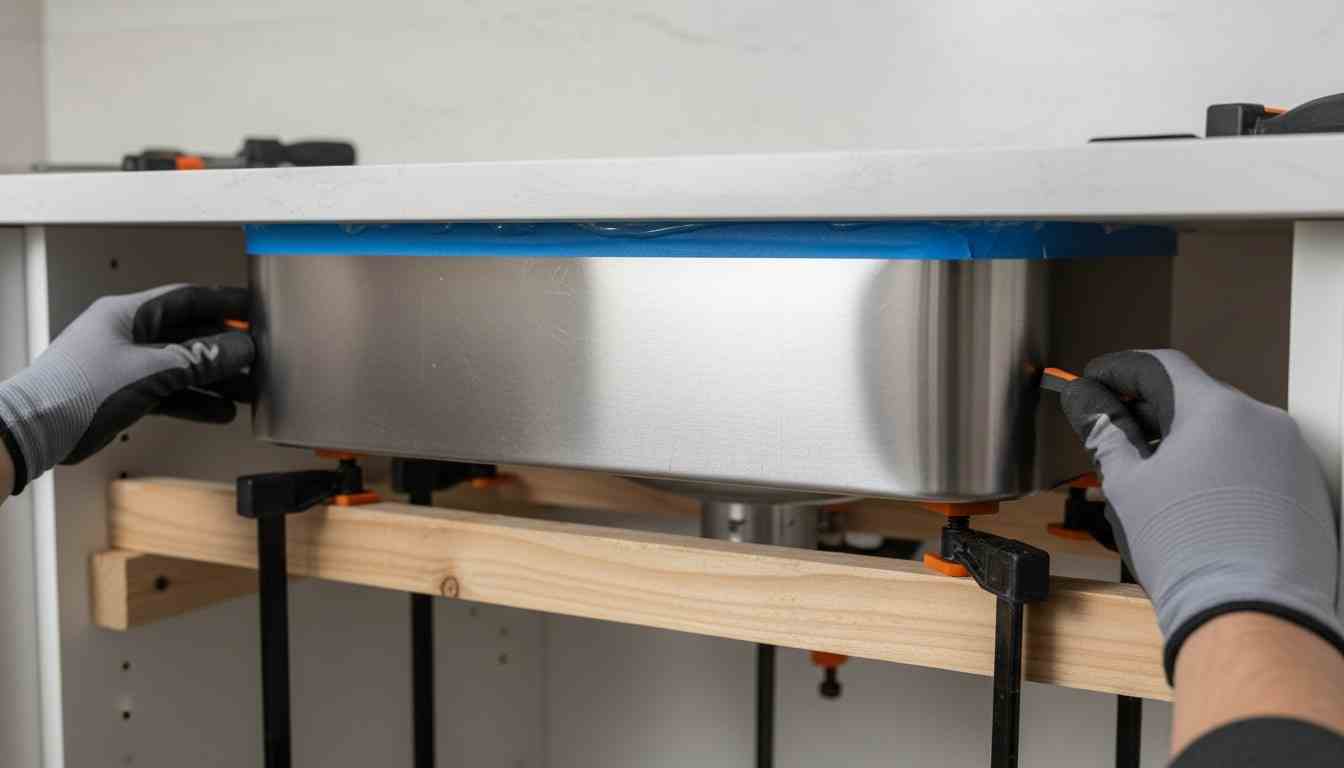
- Lift the undermount kitchen sink into position from below. Support it with bars/clamps/2×4 braces. Center it and confirm reveal and level.
- Lightly tighten clips in a cross/star pattern. Recheck alignment and level. Adjust while silicone is workable.
- Tool away excess squeeze‑out, then remove tape for clean lines. Finish tightening clips to spec without over‑torquing.
- Keep supports in place and allow silicone to cure fully (typically 12–24 hours. Follow product instructions).
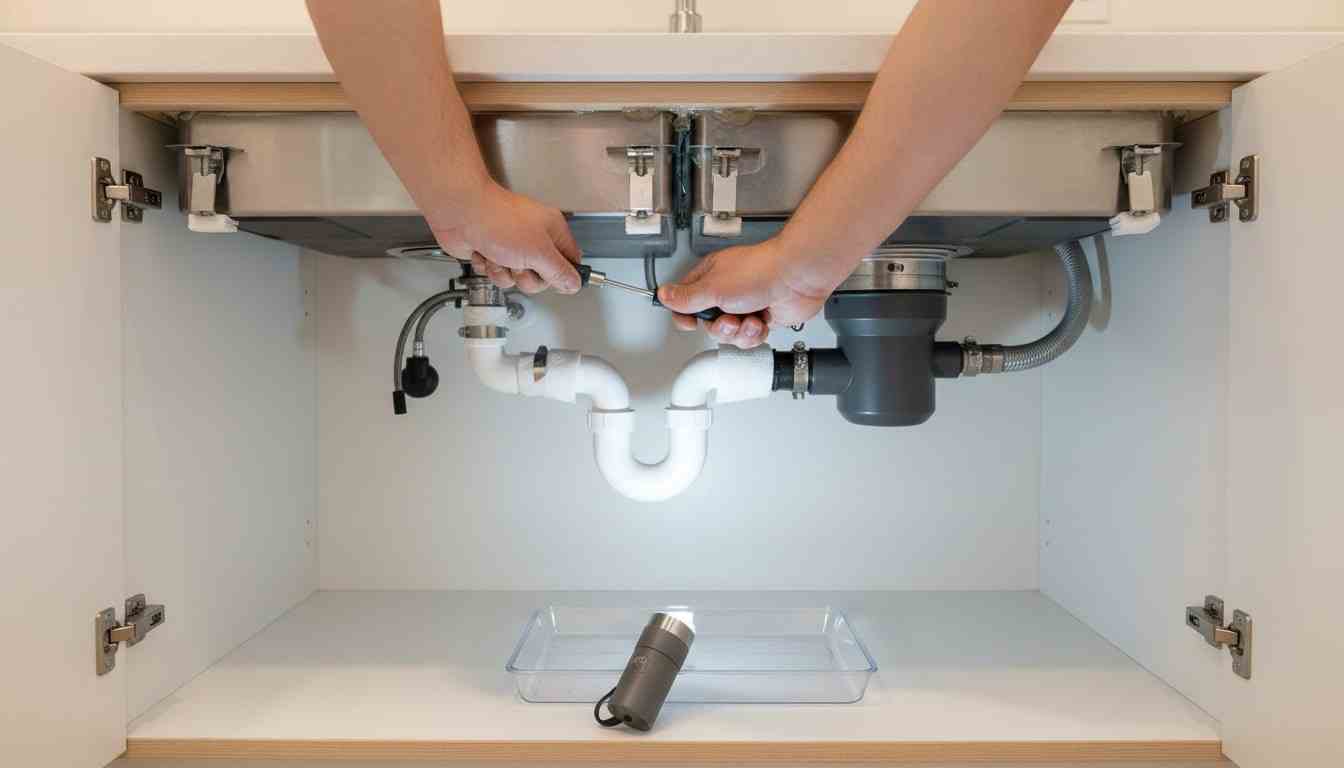
- Install the basket strainer (use plumber’s putty if required). Connect tailpiece, P‑trap, and supply lines. Apply PTFE tape on threaded connections.
- Reinstall or mount the garbage disposal and connect the dishwasher drain if applicable.
- Leak‑test: Fill the sink and check the strainer, tailpiece, and traps. Tighten or reseal any joints if needed.
- Optionally run a neat interior silicone bead at the sink/counter seam if specified. Clean the area, remove supports, and finish.
Benefits of Undermount Kitchen Sink
An undermount kitchen sink delivers practical and aesthetic benefits that improve daily cooking and cleanup. From seamless wipe-downs to better ergonomics and resale appeal, here’s why homeowners favor streamlined installation.
Seamless Countertop Cleanup
Without a raised rim, an undermount kitchen sink lets you sweep crumbs, spills, and chopped bits straight from the counter into the basin. The sink lip attaches beneath the countertop, reducing grime-trapping edges and making sanitizing faster and more thorough.
This design is especially helpful for busy meal prep zones and families. Stone and solid-surface counters shine here, since their smooth edges and the undermount profile prevent standing water, stained caulk lines, and buildup where a drop-in rim would normally sit.
Sleek Aesthetic and More Usable Space
The continuous countertop line around an undermount kitchen sink creates a clean, modern look that visually enlarges smaller kitchens. With the rim hidden below, surfaces appear less cluttered and more premium.
Functionally, you gain a bit of usable counter area at the cutout’s edge and easier placement of cutting boards or drying racks. Accessories like over-the-sink grids and roll-up mats integrate neatly, helping you turn the basin into a versatile prep, rinse, and drain station.
Customizable Reveal Options
Undermounts support three common reveals. A zero-reveal aligns the countertop flush with the sink for the crispest look and easy wiping. A positive reveal exposes a thin stainless lip, useful for spotting debris.
A negative reveal tucks the sink slightly under the counter edge, hiding the rim and shielding edges from chips. Your choice influences cleaning, splash behavior, and style. Work with your fabricator to pick the reveal that matches your habits, countertop material, and desired aesthetic.
Stable Mounting and Long-Term Performance
When installed correctly with manufacturer-approved clips, rails, and silicone, an undermount kitchen sink distributes weight securely. Modern brackets and stone anchors keep the basin aligned and resist sagging over time.
Because the faucet deck remains part of the countertop, you also reduce clutter and make wiping around fixtures simpler. Proper surface prep and cure times are key. Following specs yields a tight, durable seal that resists leaks, discoloration, and movement for years of daily use.
Quieter, More Comfortable and Potential Value Boost
Many undermount kitchen sink models include sound-deadening pads and undercoatings that dampen clatter from pots, running water, and disposers. With the rim hidden, vibrations transmit less prominently to the prep surface.
Buyers often associate undermounts with stone counters and higher-end finishes, which can enhance perceived quality in listings. While not a guarantee of higher sale price, the combined look, function, and hygiene benefits can improve first impressions and overall kitchen appeal.
Common Mistakes to Avoid
Installation of an undermount kitchen sink can go sideways without planning, clean surfaces, and proper support. Avoid these common mistakes to ensure a secure, leak-free, and long-lasting result.
Skipping Surface Prep and Cleaning
Bond strength depends on immaculate prep. Degrease the underside of the countertop and the sink flange with alcohol or acetone, then let both dry fully. Remove dust and stone slurry, and lightly scuff stainless steel only if the manufacturer allows it. Avoid oily hands after cleaning and use lint-free cloths.
Mask the reveal with painter’s tape to control squeeze out and speed cleanup. Apply fresh 100 percent silicone, not old or skinned product, and do not mix brands. Tool the bead smoothly and remove tape while the silicone is still workable to leave a clean line and strong seal.
Misaligned Reveal and Uneven Overhang
Small misalignments are very noticeable around an undermount kitchen sink. Dry fit and mark front and side centerlines on the underside of the counter and on the sink. Use painter’s tape to mark the target reveal. Confirm faucet clearance, basin centering, and dish rack alignment before any adhesive touches the stone.
Support the sink with bars or braces so you can shift position without losing contact. Check the reveal at four quadrants with a ruler. Correct now, not after tightening, since clip tension will lock alignment.
Inadequate Support and Incorrect Clip Tension
An undermount kitchen sink needs mechanical support during the cure and in the long term. Use manufacturer-approved clips, rails, or stone anchors in the pattern provided. Add temporary 2×4 braces or adjustable supports to carry the load while silicone sets. Heavy sinks and disposers may require extra brackets or a cradle.
Do not over-tighten clips, especially on brittle stone. Tighten incrementally in a star pattern and follow torque guidance. Under tightening allows movement and gaps. Over-tightening can chip the edge, deform flanges, and squeeze out too much silicone.
Using the Wrong Sealant and Rushing Cure Time
Use 100 percent silicone rated for kitchen and bath. For natural stone, choose a neutral cure formula to avoid discoloration. Avoid acrylic caulk, latex caulk, and rigid construction adhesive. Do not rely on epoxy alone for the bond unless the manufacturer specifies a combined method with anchors or rails.
Respect temperature and humidity limits on the label. Keep supports in place for the full cure window, often 12 to 24 hours. Do not plumb, fill, or load the sink early, since movement can break the seal.
Poor Plumbing Reassembly and Missed Leak Tests
Replace worn gaskets and the basket strainer if needed. Use plumber’s putty when the strainer requires it, or silicone if specified by the maker. Wrap male threads with PTFE tape and align the P-trap without strain. Provide a high loop or air gap for the dishwasher drain.
Leak test in stages. First, run a slow stream and check every joint with a dry finger and paper towel. Then fill the basin and release the stopper while watching the strainer and traps for drips.
Mounting to Unsuitable Countertop Materials
An undermount kitchen sink works best with stone and solid surface tops that can hold anchors and finish clean edges. Standard laminate is often not recommended. Some fabricators offer reinforced methods or special rails, though warranties may be limited. Edge sealing and mechanical rails can reduce risk, but they add cost and complexity.
If you plan a wood or laminate counter, discuss moisture protection and added support before purchase. You may need an apron front sink or a drop in instead. Follow the countertop maker’s guidance to preserve coverage. Failure to address water exposure can swell substrates and loosen fasteners over time.
Conclusion
Installing an undermount kitchen sink is a precise project that rewards patience with a seamless look and easier cleanup. With careful prep, correct hardware, and the right sealant, a DIY installation can be as durable as a pro job. Plan your reveal, support the basin during cure, and test plumbing in stages to avoid leaks. If you meet limits on weight, countertop material, or cutout condition, bring in a fabricator to protect your investment.
FAQs: Undermount Kitchen Sink
- How long does an undermount kitchen sink installation take and what should I budget?
- Most DIY installs take 3 to 6 hours of hands-on time, plus 12 to 24 hours of silicone cure time before you reconnect plumbing and load the sink. Expect 60 to 180 dollars in materials for silicone, a basket strainer, a new P-trap, cleaners, and odds and ends. Pro labor for a straightforward swap often runs 200 to 600 dollars, rising to 600 to 1200 dollars for heavy sinks, disposers, or new hardware. Regional rates, access, and the condition of the cutout can shift these ranges.
- What extra support is needed for heavy cast iron or fireclay sinks?
- Heavy basins can exceed 150 pounds when filled, so add mechanical support beyond clips and silicone. Use sidewall support rails, a sink harness, or a plywood subtop that transfers weight to cabinet walls. Install brackets in a pattern approved by the sink and countertop makers and confirm fastener type for stone. If you run a disposer, consider anti vibration mounts and verify that the support system is rated for dynamic load, not just the empty sink.
- What cabinet and countertop requirements should I check before buying a sink?
- Choose a sink at least 1 to 3 inches narrower than the interior cabinet width to leave room for clips, rails, and plumbing. Stone at 3 cm thickness is ideal, while 2 cm usually needs a plywood subtop for stiffness. Ask the fabricator for the inside corner radius they prefer, since larger radii reduce stress cracking, often similar to R10 to R20. Confirm faucet hole spacing, backsplash clearance, and that the counter underside is flat and polished at the cutout.
- Can I undermount to laminate or wood countertops?
- Standard laminate is not ideal for an undermount kitchen sink due to water exposure and limited fastener pull out strength. Some shops will install a solid surface or stainless conversion ring that bonds to the cutout and provides a sealed rim and mechanical rails. Wood tops need aggressive waterproofing of the cutout and a robust support frame, and warranties can be limited. If moisture risk is high, consider a drop in or an apron front sink instead.
- Can I replace an undermount sink without removing the countertop?
- Yes, if the cutout is sound and the anchors are serviceable. Support the old sink from below, loosen or cut the clips, and carefully slice the silicone joint. Scrape away residue, clean with alcohol, and dry fit the new basin to confirm reveal and plumbing alignment. Reuse serviceable anchors or add retrofit rails, then set the new sink with fresh silicone, tighten hardware in a cross pattern, and allow a full cure before reconnecting plumbing.